
Introduction
There’s something almost magical about a pot of perfectly cooked rice. Each grain is fluffy and separate. The texture is just right. The taste is clean and satisfying. Yet for something so seemingly simple, cooking rice on the stove trips up even experienced home cooks. You’ve probably been there. The rice turns out mushy, sticky, or worse—burnt on the bottom with raw grains on top.
Here’s the good news. Learning how to cook rice on the stove isn’t difficult once you understand a few key principles. You don’t need fancy equipment or special skills. What you need is the right ratio of water to rice, proper timing, and a handful of techniques that work consistently. This guide will walk you through everything you need to know. You’ll discover different cooking methods, learn which type of rice needs what treatment, and pick up tricks that make the process foolproof. By the end, you’ll be cooking restaurant-quality rice in your own kitchen.
Understanding Your Rice: Types and Their Differences
Before you start cooking, you need to understand what you’re working with. Rice isn’t just rice. Different varieties have different starch contents, grain lengths, and cooking requirements.
Long-grain rice like basmati and jasmine stays fluffy and separate when cooked. The grains are slender and elongated. This type works beautifully for pilafs, fried rice, and side dishes. Medium-grain rice is shorter and slightly plumper. It has more starch, which makes it a bit stickier. You’ll find this variety in Spanish and Italian cooking. Short-grain rice is almost round and very starchy. Think sushi rice or risotto rice. It clumps together naturally, which is exactly what you want for certain dishes.
White rice has had its husk, bran, and germ removed. It cooks faster and has a milder flavor. Brown rice keeps the bran layer intact. This makes it more nutritious but also means it takes longer to cook. The extra fiber and oils give it a nuttier taste and chewier texture.
Each type requires slight adjustments in water ratio and cooking time. Understanding these differences will help you choose the right method.
The Essential Tools You’ll Need
You don’t need a kitchen full of gadgets to cook rice on the stove. A few basic items will do the job perfectly.
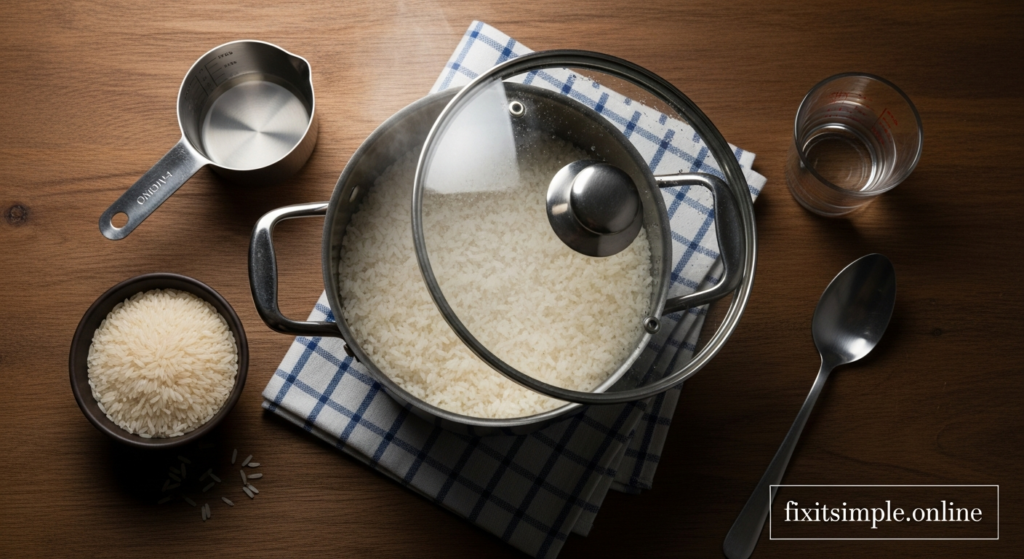
First, you need a heavy-bottomed pot with a tight-fitting lid. The heavy bottom distributes heat evenly and prevents burning. The tight lid traps steam, which is essential for cooking the rice through. A two or three-quart saucepan works well for most home cooking needs.
A measuring cup is your second essential tool. Precision matters when you’re getting the water-to-rice ratio right. Use the same cup for both rice and water to maintain consistency.
You’ll also want a fine-mesh strainer if you plan to rinse your rice. Rinsing removes excess starch and prevents gumminess. Some cooks skip this step, but I’ve found it makes a noticeable difference in texture.
A fork for fluffing is the final tool. Never use a spoon to stir cooked rice. A fork gently separates the grains without smashing them.
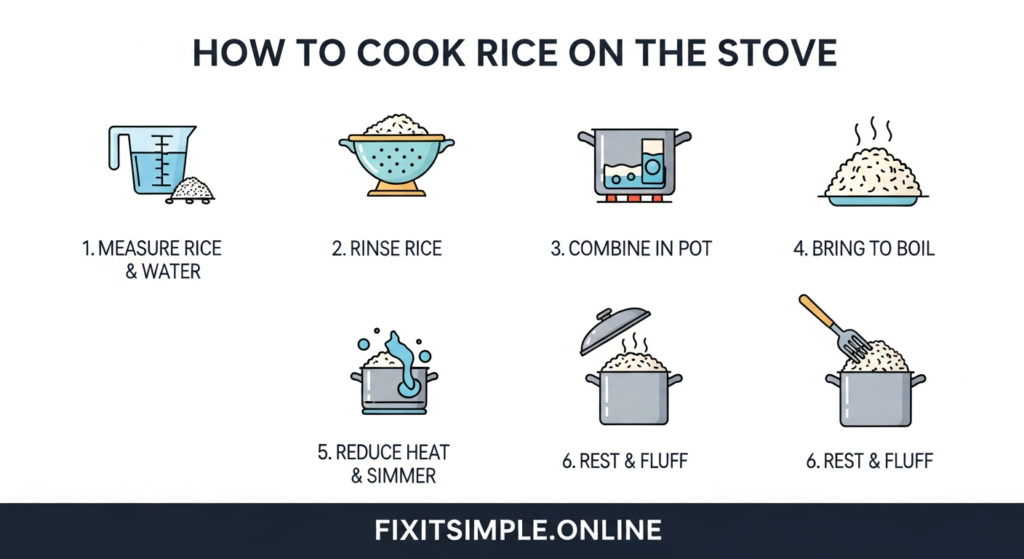
The Classic Absorption Method: Your Go-To Technique
The absorption method is how most people learn to cook rice on the stove. It’s straightforward, reliable, and works for nearly every type of white rice.
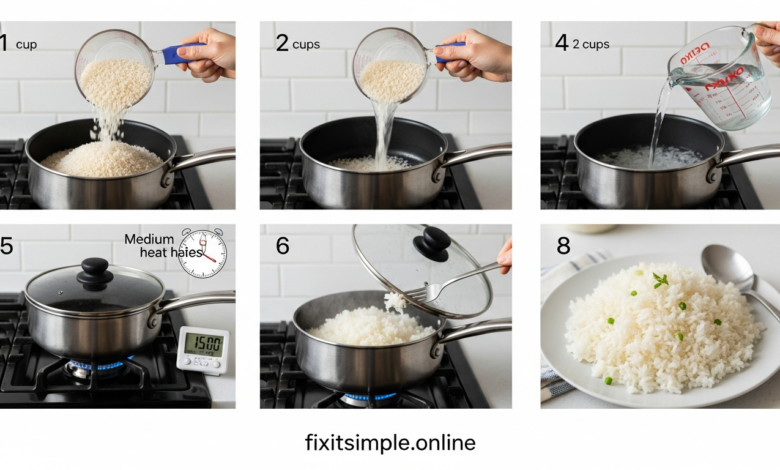
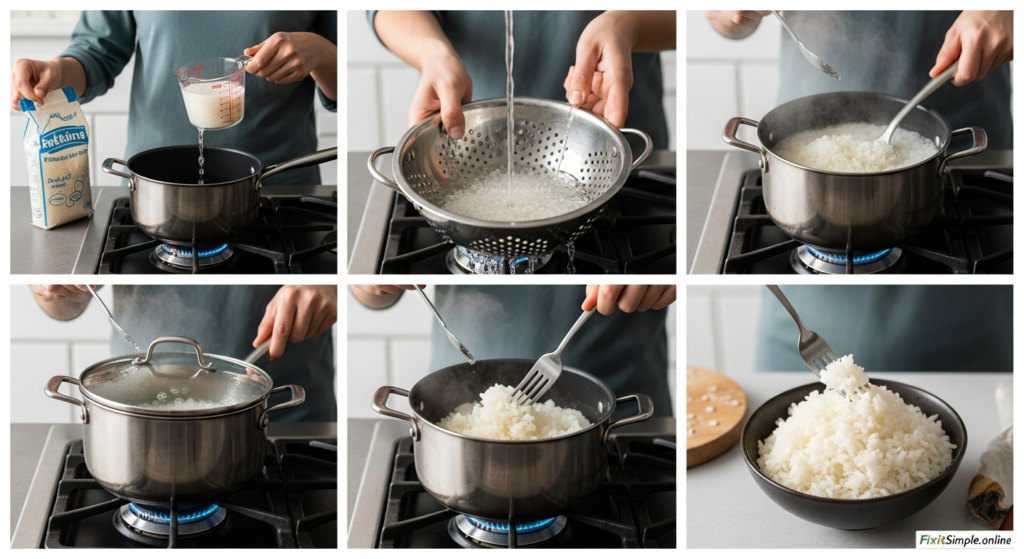
Start by measuring your rice. One cup of uncooked rice typically yields about three cups of cooked rice. That’s enough to feed three to four people as a side dish. Rinse the rice under cold water until the water runs clear. This usually takes about thirty seconds of gentle agitation with your fingers.
Place the rinsed rice in your pot. Add water using the standard ratio of one and a half cups of water for every cup of white rice. Some cooks prefer a two-to-one ratio for softer rice. Add a pinch of salt if you like. It enhances the flavor without making the rice taste salty.
Place the pot over high heat and bring it to a boil. Don’t cover it yet. You want to see when it reaches a full, rolling boil. Once it does, give it a quick stir to prevent sticking. Then reduce the heat to the lowest setting and cover the pot with the lid.
Here’s where patience becomes important. Let the rice simmer for eighteen to twenty minutes without lifting the lid. Every time you peek, you release steam that the rice needs to cook properly. Set a timer and walk away.
When the timer goes off, turn off the heat. Keep the lid on and let the rice rest for five to ten minutes. This resting period allows the moisture to redistribute throughout the pot. The grains firm up slightly and become perfectly fluffy.
Finally, remove the lid and fluff the rice with a fork. Run the fork through the rice gently, lifting and separating the grains. Your rice is ready to serve.
The Pasta Method: A Forgiving Alternative
The pasta method offers more flexibility and is nearly impossible to mess up. You use excess water and drain the rice when it’s done, just like cooking pasta.
This technique works especially well when you’re cooking rice for the first time or working with an unfamiliar variety. You don’t need to worry about exact ratios or perfect timing.
Fill your pot with water, about six to eight cups for every cup of rice. Add salt generously. The rice will absorb some of the salt as it cooks, so don’t be shy. Bring the water to a rolling boil over high heat.
Add your rinsed rice to the boiling water. Give it a stir to prevent clumping. Let the rice cook uncovered, stirring occasionally. White rice usually takes about twelve to fifteen minutes. You’ll know it’s done when a grain tastes tender but still has a slight bite in the center.
Set up your strainer in the sink. Pour the rice through it to drain off all the excess water. Let it sit for a minute to drain completely. Then transfer it back to the warm pot, cover it, and let it steam for about five minutes.
The pasta method produces slightly less fluffy rice than the absorption method. The grains can be a touch softer. But it’s consistent and forgiving, which makes it perfect for beginners.
Cooking Brown Rice: Adjusting for Whole Grains
Brown rice needs special attention because of its intact bran layer. The same techniques work, but you’ll need to adjust the water and time.
Use a ratio of two and a half cups of water for every cup of brown rice. The extra liquid and longer cooking time are necessary to soften that tough outer layer. Bring the water and rice to a boil, then reduce heat and cover just like with white rice.
Brown rice needs to simmer for about forty-five minutes. Yes, that’s more than twice as long as white rice. The wait is worth it for the nutty flavor and nutritional benefits. After the cooking time, let it rest covered for ten minutes before fluffing.
Some people soak brown rice for a few hours before cooking. This can reduce the cooking time by about ten minutes and makes the rice easier to digest. If you’re planning ahead, it’s worth trying.
Troubleshooting Common Rice Problems
Even experienced cooks run into rice troubles sometimes. Here’s how to fix the most common issues.
If your rice turns out mushy and wet, you used too much water or cooked it too long. Next time, reduce the water by a quarter cup. Make sure you’re keeping the heat low enough during simmering. The water should barely bubble.
Burnt rice on the bottom happens when the heat is too high or the pot has a thin bottom. Invest in a heavy-bottomed pot if this keeps happening. Also check that you’re using the lowest heat setting on your stove.
Crunchy or undercooked rice means you didn’t use enough water or didn’t cook it long enough. Add a few tablespoons of water, cover the pot, and let it cook for a few more minutes. Check it again and repeat if needed.
Rice that sticks together in clumps usually wasn’t rinsed well enough. The excess starch causes grains to glue together. Always rinse until the water runs clear. Also make sure you’re fluffing with a fork rather than stirring with a spoon.
Enhancing Flavor: Beyond Plain Rice
Plain rice is wonderful, but sometimes you want more flavor built right in. A few simple additions transform rice from a blank canvas to a star side dish.
Toast your rice in a bit of butter or oil before adding water. This gives it a nutty depth and helps keep grains separate. Use about one tablespoon of fat for every cup of rice. Stir the rice in the hot fat for two to three minutes until it smells fragrant.
Replace some or all of the water with broth. Chicken, vegetable, or beef broth adds savory richness. You can also add a bay leaf, a few garlic cloves, or a cinnamon stick to the cooking liquid. Remove these aromatics before serving.
For a citrusy twist, add a strip of lemon or lime zest to the pot. The oils infuse the rice with bright flavor. Fresh herbs like cilantro, parsley, or dill can be stirred in after cooking. Toasted nuts or dried fruit make excellent mix-ins too.
I often cook rice in coconut milk for Thai or Caribbean dishes. Use one cup of coconut milk and one cup of water for every cup of rice. The result is creamy and fragrant.
The Resting Period: Why It Matters
That final resting time after cooking isn’t optional. It’s actually a crucial step that many people skip.
When rice finishes cooking, the grains on the bottom are wetter than those on top. The resting period allows moisture to redistribute evenly throughout the pot. Steam continues to work its magic, firming up the texture.
During resting, any excess moisture evaporates from the surface of the rice. This prevents that gummy, sticky texture. The grains separate more easily when you fluff them.
Always rest your rice for at least five minutes. Ten minutes is even better if you have the time. Keep the lid on and resist the urge to peek. This simple patience makes the difference between good rice and great rice.
Storing and Reheating Cooked Rice
Cooked rice keeps well if you store it properly. Let it cool to room temperature first, but don’t leave it out for more than an hour. Rice can harbor bacteria that multiply at room temperature.
Transfer cooled rice to an airtight container. It will keep in the refrigerator for four to five days. For longer storage, freeze it in portion-sized containers or freezer bags. Frozen rice stays good for up to six months.
Reheating rice requires adding moisture back in. Sprinkle a tablespoon or two of water over refrigerated rice. Cover it and microwave for one to two minutes. For stovetop reheating, add rice and a splash of water to a pan. Cover and heat over medium-low, stirring occasionally.
Fried rice is the perfect use for leftover rice. Day-old rice that’s dried out slightly actually works better than fresh rice for frying. The drier texture means it won’t get mushy in the pan.
Cultural Variations: Rice Around the World
Different cultures have perfected their own rice cooking methods over centuries. These techniques offer valuable lessons.
Persian rice involves parboiling the rice, then steaming it with butter. This creates a golden, crispy bottom layer called tahdig. It’s considered the best part of the dish.
Japanese rice cooking emphasizes rinsing until the water is crystal clear. The rice is then soaked for thirty minutes before cooking. This produces the sticky texture perfect for sushi and rice balls.
Spanish paella cooks rice uncovered in a wide, shallow pan. The rice absorbs flavorful broth while developing a crispy bottom layer. The key is not stirring once you add the rice.
Indian biryani layers partially cooked rice with meat and spices. The pot is sealed with dough and cooked on very low heat. This dum cooking method steams everything together.
Each method has something to teach us about heat, moisture, and timing.
Scaling Up: Cooking Rice for a Crowd
Cooking large quantities of rice follows the same principles, but with some adjustments. The water ratio becomes slightly more forgiving with larger amounts.
For four or more cups of rice, you can reduce the water ratio slightly. Instead of one and a half cups of water per cup of rice, use one and a quarter cups. The steam in a fuller pot does more of the work.
Use your largest pot with a heavy bottom. Make sure all the rice can spread in a relatively even layer. If the rice is too deep, the top won’t cook evenly.
Increase the cooking time by five to ten minutes for large batches. The extra mass takes longer to heat through. Check for doneness by tasting a grain from the center of the pot.
For truly large quantities, consider using a roasting pan in the oven. Combine rice, water, and salt in the pan. Cover tightly with foil. Bake at three hundred fifty degrees for about an hour. This hands-off method works great for parties.
Common Myths About Cooking Rice
Let’s clear up some misconceptions that might be holding you back.
Myth one: You must use a rice cooker for good rice. Rice cookers are convenient, but a pot on the stove works just as well. Millions of people around the world cook perfect rice on the stovetop every day.
Myth two: Stirring rice while it cooks makes it fluffy. Actually, stirring releases starch and makes rice sticky. Stir only once at the beginning if needed, then leave it alone.
Myth three: Rice needs to be soaked before cooking. White rice doesn’t require soaking. Brown rice benefits from it, but it’s not mandatory. Soaking is traditional for some varieties but not essential.
Myth four: You can’t open the lid while rice cooks. You shouldn’t open it repeatedly, but a quick peek near the end won’t ruin your rice. Just don’t make a habit of it.
Conclusion
Learning how to cook rice on the stove is a fundamental skill that pays dividends in your kitchen. You’ve now got multiple methods in your arsenal. The absorption method for everyday cooking. The pasta method for foolproof results. Adjustments for brown rice and tips for adding flavor.
Remember the key principles. Use the right water ratio for your rice type. Keep the heat low during simmering. Let the rice rest before serving. Fluff gently with a fork.
Practice makes perfect, but even your first attempt should give you good results. Don’t be intimidated by past failures. Rice cooking is forgiving once you understand the basics. Start with simple white rice using the absorption method. Once you’ve mastered that, experiment with different varieties and flavoring techniques.
What will you cook with your perfect rice? Will it be a fragrant jasmine rice to accompany curry, or perhaps a nutty brown rice for a Buddha bowl? The possibilities are endless when you’ve got this essential skill down.
FAQs
Do I need to rinse rice before cooking it? Rinsing removes excess surface starch and prevents gummy rice. It’s especially important for long-grain varieties like basmati and jasmine. Rinse under cold water until the water runs clear, usually about thirty seconds. Some rice like risotto rice shouldn’t be rinsed because you want that starch.
Why is my rice always mushy? Mushy rice usually means too much water or overcooking. Try reducing your water by a quarter cup next time. Also make sure your heat is low enough during simmering. The water should barely bubble. Letting rice sit too long after cooking can also make it mushy.
Can I cook rice without a lid? A lid is essential for the absorption method because it traps steam. Without a lid, the water evaporates too quickly and the rice won’t cook through. If you don’t have a lid that fits, you can use aluminum foil secured tightly around the pot edges.
How much does rice expand when cooked? Most rice roughly triples in volume when cooked. One cup of uncooked rice yields about three cups of cooked rice. This serves three to four people as a side dish. Plan accordingly when measuring for recipes or meal prep.
What’s the best rice for beginners? Long-grain white rice like jasmine or basic white rice is most forgiving for beginners. It’s less sticky than short-grain and cooks faster than brown rice. The standard ratios and timing work consistently. Once you master white rice, branch out to other varieties.
Can I add oil or butter to the cooking water? Yes, adding a small amount of fat helps prevent sticking and adds flavor. Use about one tablespoon per cup of rice. You can add it to the water or toast the rice in the fat before adding water. Both methods work well.
Why does my rice burn on the bottom? Burning happens when heat is too high or the pot has a thin bottom. Always use the lowest heat setting once the rice is simmering. Invest in a heavy-bottomed pot if this is a recurring problem. Also check that you’re using enough water.
Is it safe to reheat rice? Yes, but handle it carefully. Cool cooked rice quickly and refrigerate within one hour. Reheat it thoroughly until steaming hot all the way through. Don’t reheat rice more than once. Properly stored rice is safe for four to five days in the fridge.
What’s the difference between parboiled rice and regular rice? Parboiled rice has been partially cooked in its husk before milling. This drives nutrients into the grain and makes it less sticky. It takes slightly longer to cook than regular white rice but stays firmer and more separate. It’s great for dishes where you want distinct grains.
Can I freeze cooked rice? Absolutely. Freeze rice in portion-sized containers or freezer bags. It keeps for up to six months. Thaw in the refrigerator overnight or reheat directly from frozen. Add a splash of water when reheating to restore moisture. Frozen rice works great for fried rice dishes.
Also read fixitsimple.online